Got a cosplay idea but the character has lots of arm (or leg) tattoos? Don’t feel like painting on yourself with body paints or hunting down that horrendously expensive temporary tattoo paper? Here’s a quick tutorial for making tattoo sleeves using nylons and sharpie markers!
Upsides:
– Supplies are cheap! You may even have many or all the supplies you need right at home.
– Quick and not very messy! No paint is involved, and sharpie marker dries instantly.
– Easy! Great artistic skill not required.
– They move with your skin! People have legit thought these were real tattoos. From a distance, yes, but I had guys at cons with actual ink on their arms come over to compliment on my full (fake) sleeves.
– You get to eat pringles! More on that later.
Downsides:
– They are delicate. Nylons get holes in them super easy and forearms run into stuff, lean against things, and generally make it hard for the sleeves to survive. But if you only need them for a weekend, that’s ok.
– I haven’t experimented too much, but unfortunately this technique probably doesn’t work for wearers with darker skin tones. Sharpie ink is transparent, so any color it rests on just multiplies and the tattoo won’t show up very well. You’ll want to go the fabric paint or body paint route to get the best bold, bright tats.
– Can’t do white sections, because sharpie ink is transparent and doesn’t come in white. I leave them blank and they read OK, but the white areas will always be pink, tan, brown, etc. unless you dab in a little fabric paint, which will not be covered in this tutorial.
– Sharpie is supposed to be permanent marker, but on skin…it’s not. The ink will most likely wear off onto adjacent clothes. Not that big of a deal for me, as I tend to wear my tats with white shirts that can be bleached, but other shirts may not survive as well.
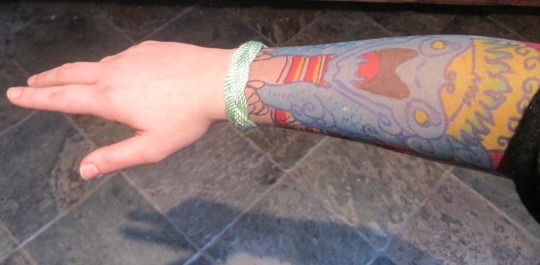
OK, let’s go! Here are your supplies:
You’ll need a pair of nylons, scissors, tape, a set of sharpies, your designs printed out on 8.5 x 11 paper, some bracelets, and a can of Pringles. You can use any design you want, of course, but Here is the link to these fine Newt Kaiju tattoo designs.
If your nylons have an undies part, cut the legs off and wear the undies on your head for the rest of the tutorial, if desired. Put the legs on your arm like so, and cut the toes off so you can slip your hand through. You can cut some of the top of the sleeve off as well, but don’t cut too much because you can’t put it back on if your sleeves are too short.
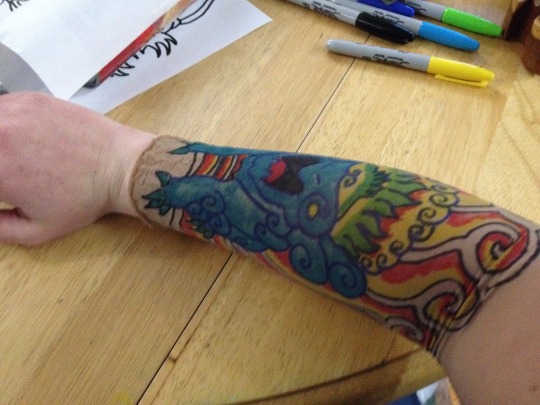
Here are my creepy sleeves. Now for the pringles.
Tape your design template to the Pringles can. It doesn’t reach all the way around but eh. The Pringles can gives you a nice stable surface to draw on that is roughly the shape and size of an arm. It’s a little short, so just roll up the rest of the nylon above the workspace and adjust both template and nylon down when you get to working on that part of the sleeve.
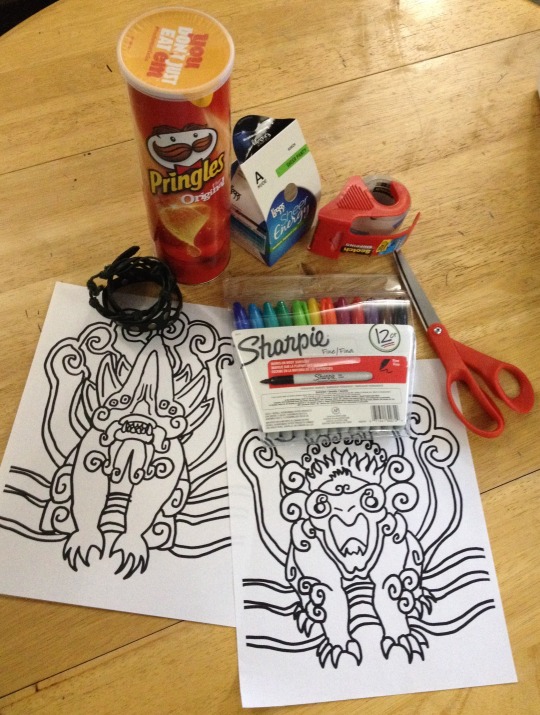
Color with the markers! I recommend doing the colored areas first and then doing the black outlines on top of it, to avoid the black ink contaminating the ink pads of the lighter markers. Remember how that always happens to the yellow ones? Eww. Nylons are thin and slide around a bit, so it’s best to use short strokes and dotting to get the ink on.
Take the template off the Pringles tube, flip the paper to the blank side and put it back on again. The paper collects the extra ink, so it’s hard to see any missed spots. Now you can see any bits you may have missed. Fill them in for completion. Also, the paper doesn’t manage to wrap all the way around the Pringles can, so now is the time to free-hand a bit of the design where the template doesn’t reach. For Newt tattoos, that’s the back of the arm.
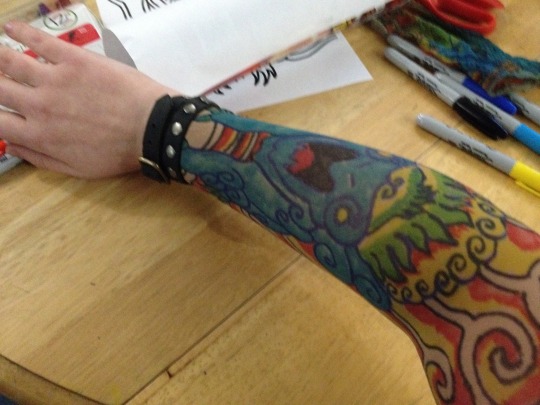
When you’re all done coloring, put them on!
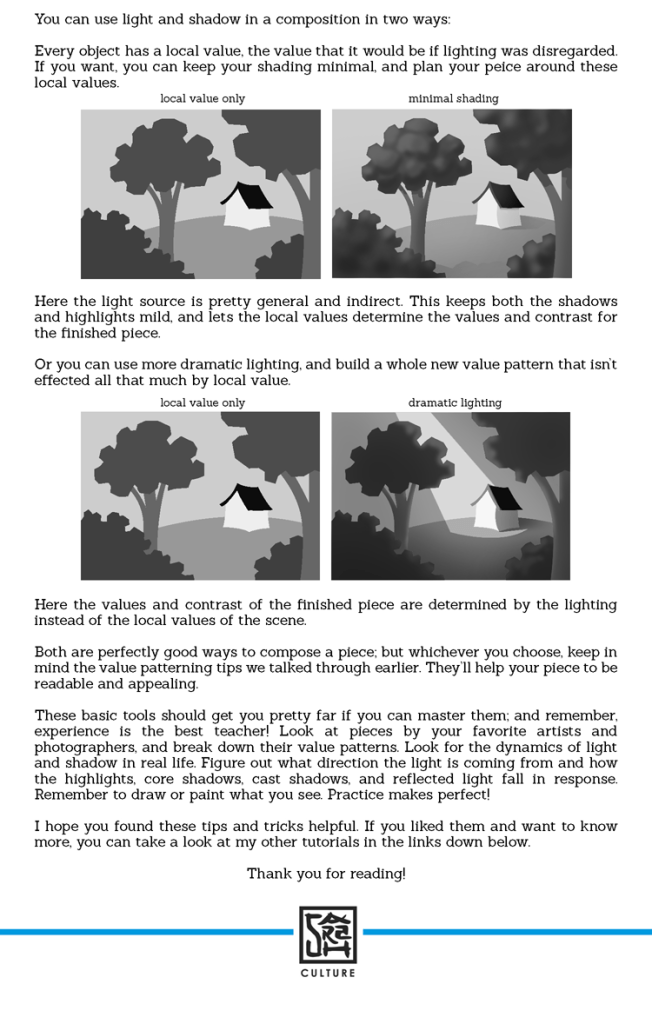
There’s a rough end to the tattoo right at the wrist, of course. Disguise where the sleeve ends and your skin begins with some pretty bracelets:
There we are, much better!
Now…you’re done! Have some Pringles!
SLAMS THE REBLOG BUTTON
from a tattooist perspective: use the navy sharpie not the black or blue for your lines, they will look like healed black ink.
This is amazing. Particularly “if your nylons have an undies part, cut the legs off and wear the undies on your head for the rest of the tutorial, if desired.”
While AO3 has a way to click to see notes at the end, this tutorial is how you can not only have your viewers click to view certain notes, but also click back to where they had been reading before. We don’t even need to use a workskin for this, but just an implementation of simple anchor links. So whether you have a lot of references in your work or just want to let your inner Pratchett* loose, this is how you do it.
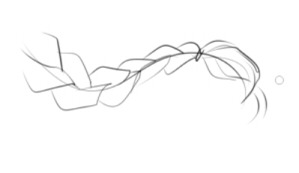
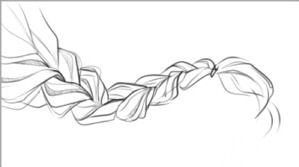
There may be easier ways of building braids than what I do, but this is just my process for drawing them, so take it with a grain of salt.
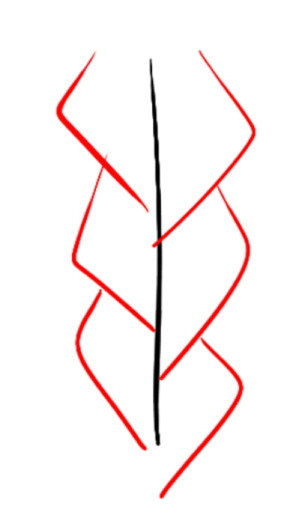
I’ll start with a line for whatever direction I want the braid to go in, if I don’t do a line and I have any kind of motion to the hair, boy do I mess it up lol
Next I’ll do wide half triangles, the line being my center, the right side or the left side always dropped lower than the other. If both sides meet in the center at the same level it’s not going to look very braid-like or have the illusion of being tangled with itself.
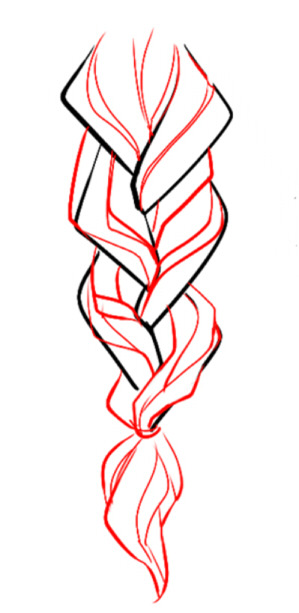
Afterwards you can remove the middle line if you want to take it further and connect each one with an alternating pattern like this one, giving it more of a braided look in the center.
Once the center is solid, you can add all the details you want in any style you like, curving inwards towards the center. I tend to like the more stained glass-ish appearance for hair so I’ll do very choppy, squared off lines to detail.
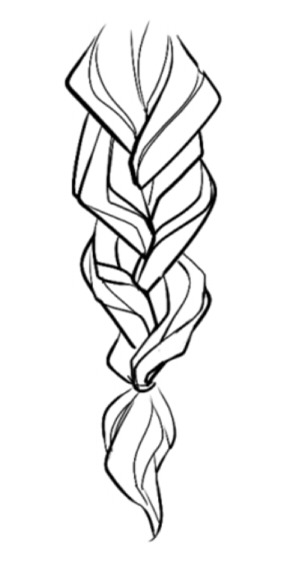
This works for whatever position you want to put the braid into using the wide triangles to build it up. It works for tightly woven or loose and messy braids depending on how wide/long you make the original half triangles.
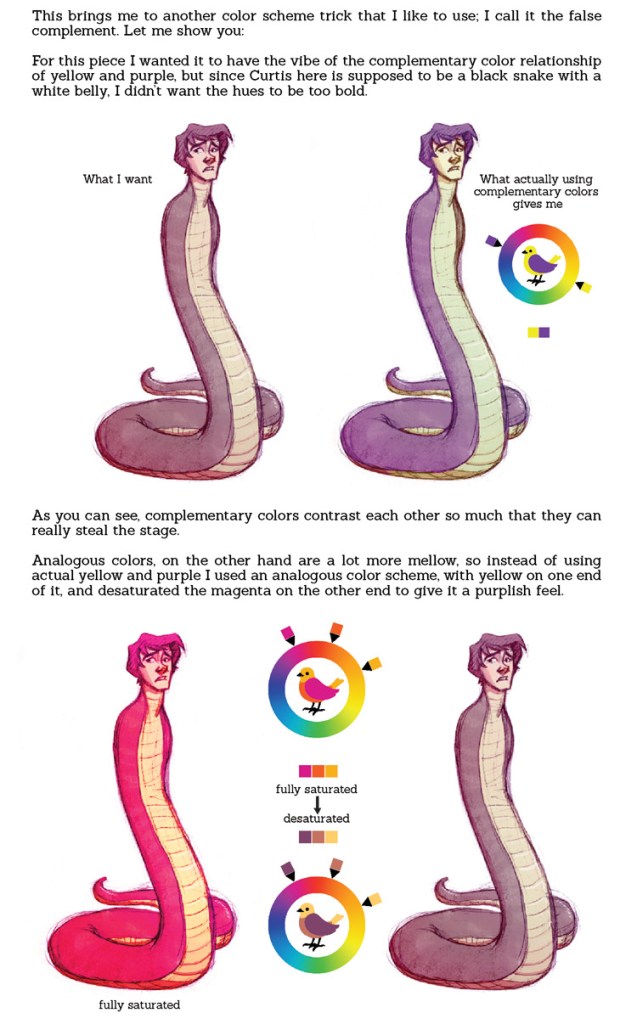
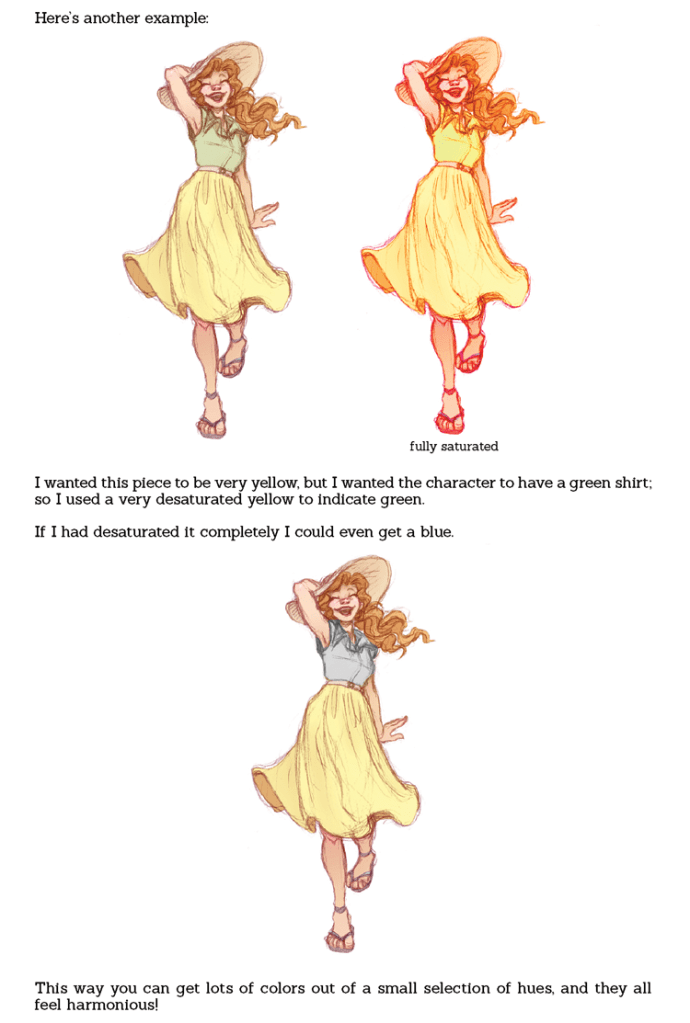
DESATURATED YELLOW LOOKS LIKE GREEN YES MY VISION IS VALIDATED I KEEP SEEING PEOPLE WITH VERY PALE BLONDE-ISH HAIR AS HAVING GREEN HAIR AND PEOPLE KEEP GETTING WEIRDED OUT BY IT BUT NO THAT IS ACTUALLY NOW COLORS WORK Y’ALL JUST HAVE PRECONCEPTIONS OF WHAT COLOR HAIR CAN AND CANNOT BE
anyway this is fantastic and i’m off to go try this out ❤
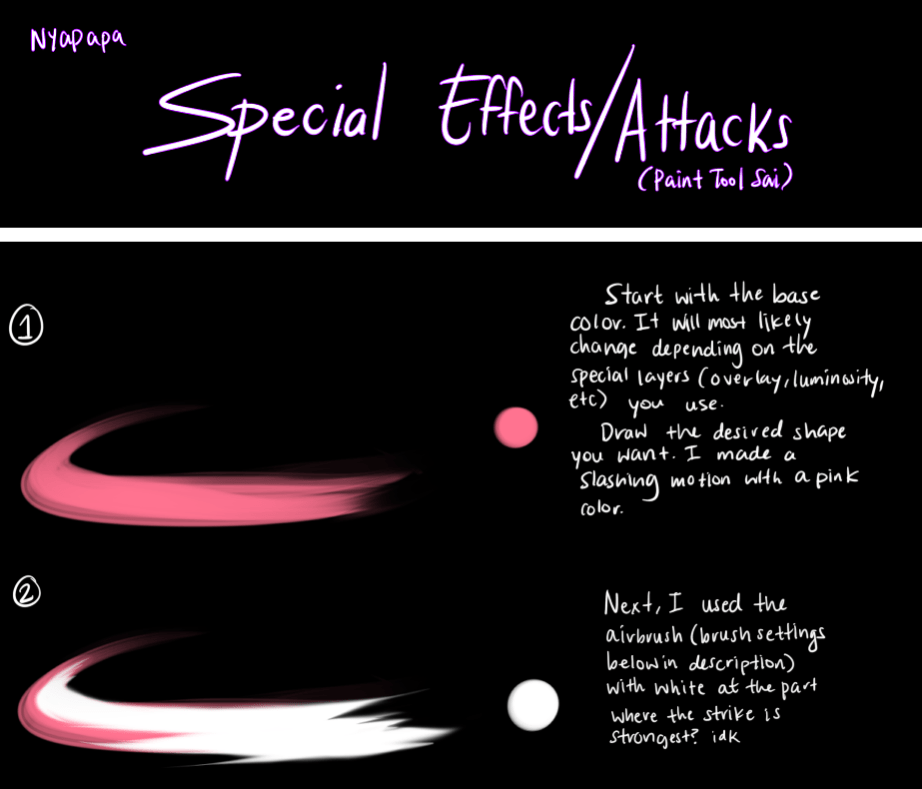
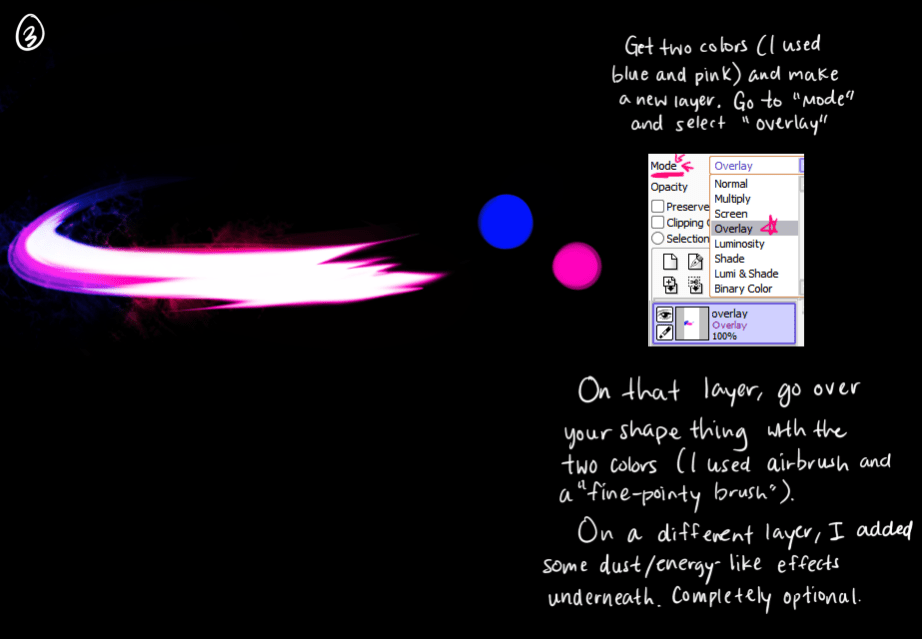
A few peeps were wondering how I drew attacks in my nuzlocke comic, so I made a quick/kinda sloppy tutorial about it! Tbh it’s just me spamming luminosity and overlay layers haha ;yyy Hope this somewhat helps!