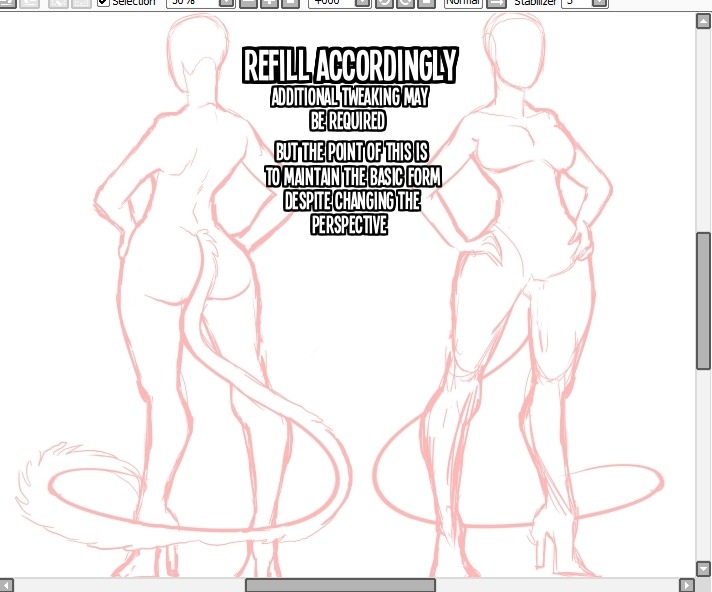
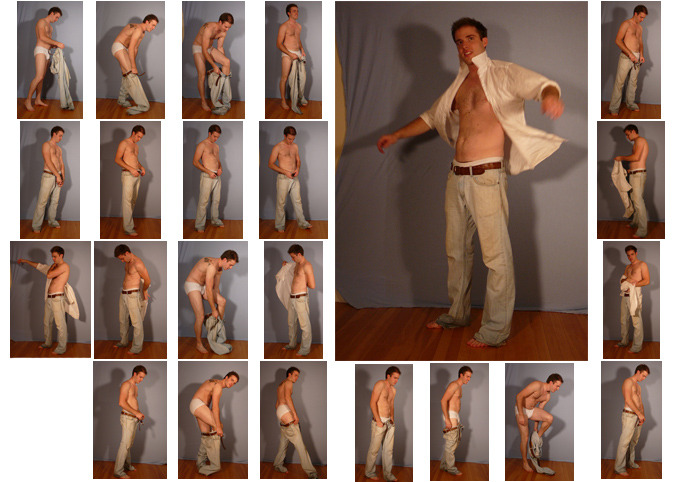
ive been asked a few times how i draw back-views, especially for character sheets so i wanted to share a little trick I learned a while back that’s really really helpful especially if you’re used to drawing things from the front and need help getting the proportions right from the back view.
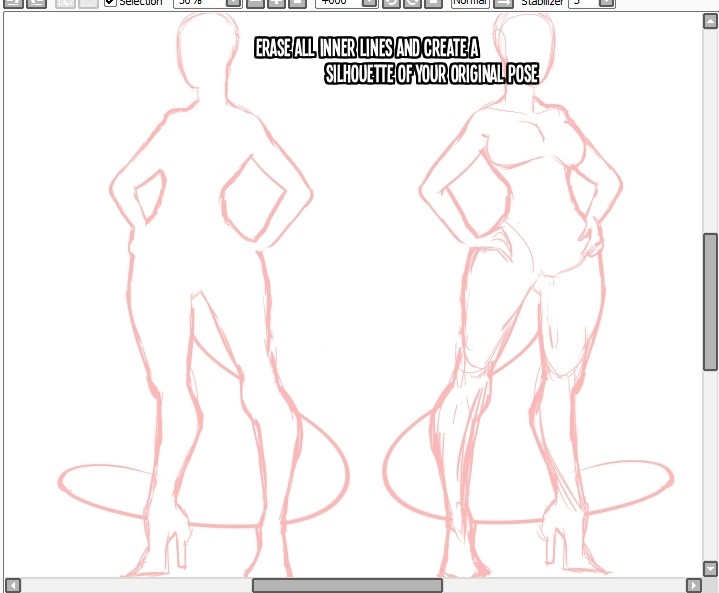
You don’t ALWAYS have to do this the way that I do; The only reason I put effort into the front view is because this is going to be a character sheet and I need the front view to be fleshed out.
But alternatively; Just sketch out a sillhouette, then fill it in on a higher layer.
Sorry if someones already done this before im just answering a frequently asked question ;w;
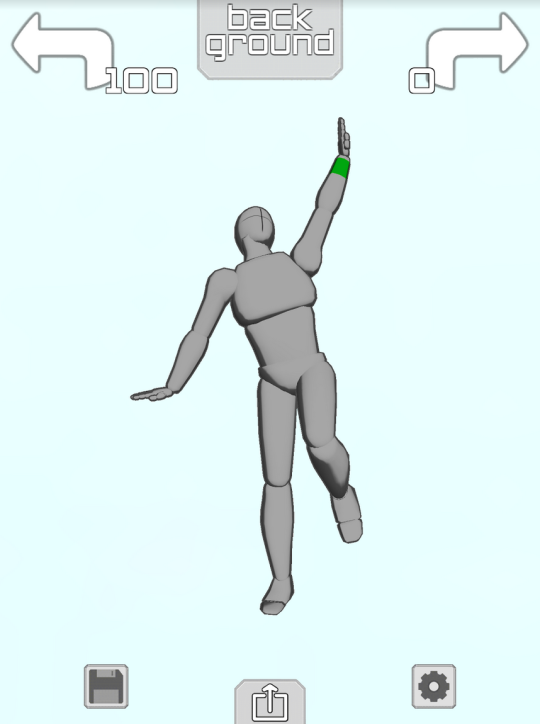
if you have an ipod or iphone or ipad or whatever then Please download the app “Make a Pose”
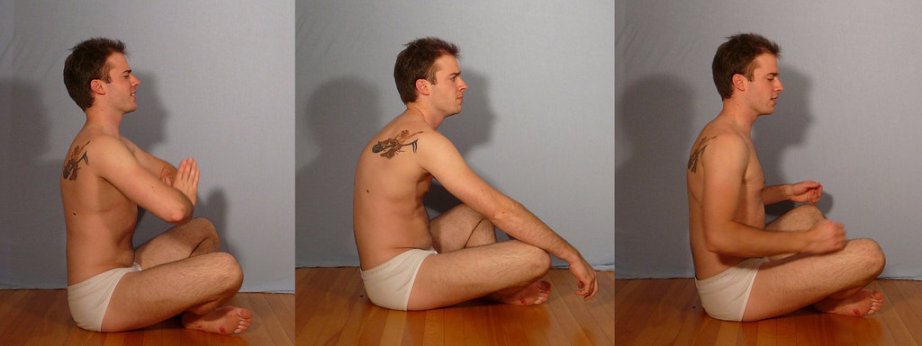
it gives you a lil figure like this
and you can make them do whatever you want!! Like
Took me about 1.4 minutes to make this sad little guy it’s Really easy to get the hang of
they Happy
you can change the camera angle so easy too so you can get perspective + foreshortening reference
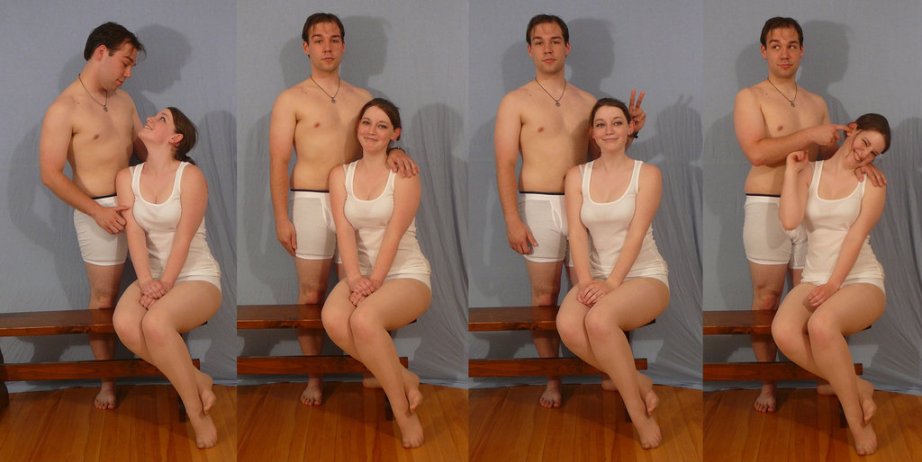
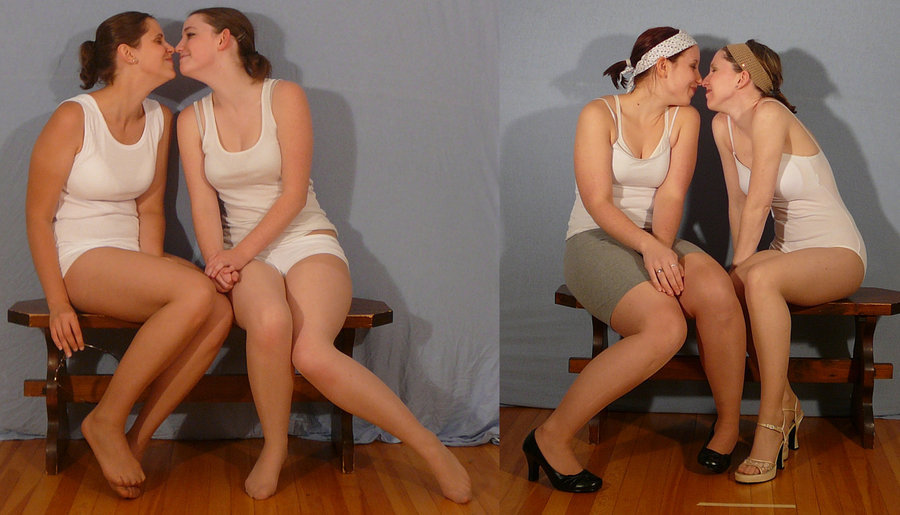
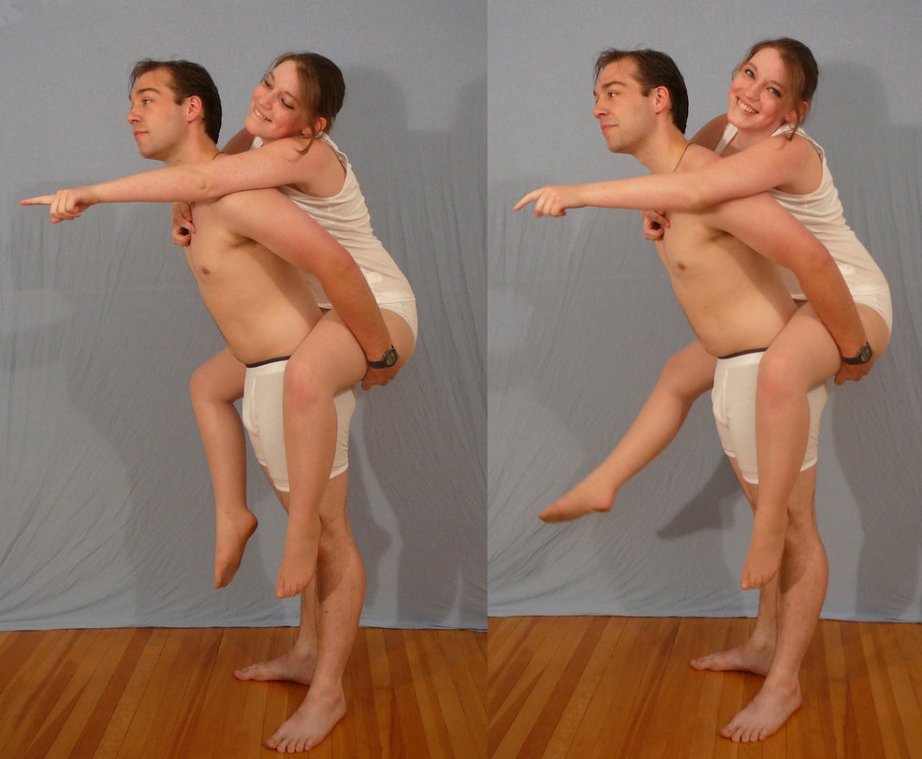
THIS IS ALL FREE TOO but if you pay $2 you unlock the ability to have two figures onscreen at the same time so you can make COUPLE POSES
AND YOU CAN CHANGE THE LIGHTING,
you can also make rooms and place some objects or characters like so:
YOU WANT A CHARACTER W/ A BIGGER CHEST? HERE THEY ARE
YOU WANT A FRICKIN HORSE?
NEIGH NEIGH MOTHER FUCKER
ANYWAY YOU CAN PAY ABSOLUTELY $0 TO GET THE APP WITH THE ABILITY TO POSE ONE FIGURE AT A TIME AND IF YOU PAY $2 YOU GET TO PUT UP TO 6 CHARACTERS ON THE SCREEN AT ONCE AND YOU ALSO GET A GOTDAMN HORSE. again it is called “Make a Pose” and it’s for iphone or ipod touch or ipad and i cannot recommend it enough
Drawing basic facial expressions is not the hardest. Most people can draw a sad face, a happy face, angry etc., but making more multidimensional expressions is more of a challenge. I have gotten a lot of compliments on how I draw facial expressions, (specifically “angsty ones”) telling me that they are very dramatic and well… expressive! And there are actually only a few things I think about when I draw faces that take them to the next level, so I thought i’d illustrate them all here!
SUPER IMPORTANT TIP BEFORE WE START: Look at your own face when you draw faces. Even making the face when you are drawing (you don’t even have to look at it), will give you some sense of how the face muscles pull and where things fold and stretch, because you can feel it. You are the best reference when it comes to facial expressions!
Angles
Draw the head in an angle that matches the expressions you want to make. It is not a requirement, but is going to add to the effect.
Symmetry vs asymmetry
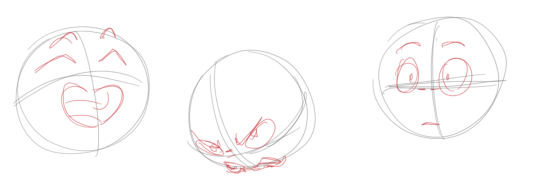
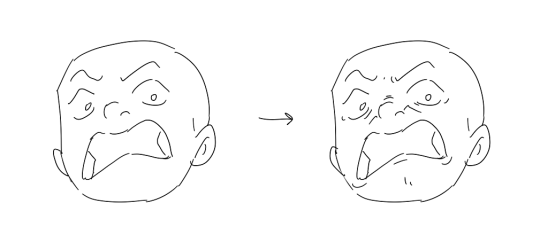
A face is rarely symmetric. Unless the face the character is making is 100 % relaxed or even dissociating, the eyebrows, mouth and facial muscles will have different placements of their respective side. This image shows the dramatic impact asymmetry has on a face:
That’s the difference between a smile and a smirk!
The first one’s like “oh yeah?” and the second is like “oH YEAH??”
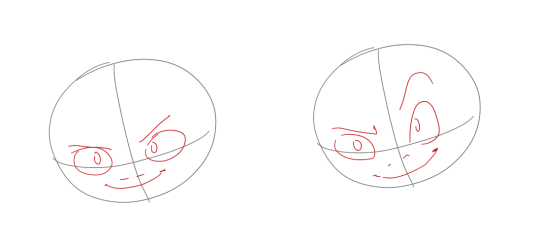
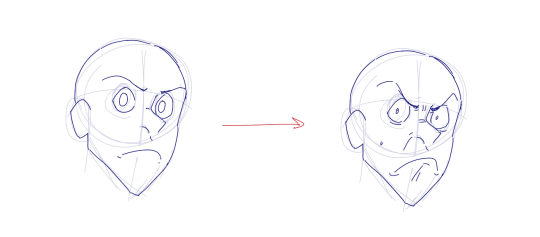
The “balloon squishing principle”
This is something I did subconsciously, and I didn’t know about until I made this tutorial. And this principle goes hand in hand with an asymmetric face. Basically, if you squish one part of the face, you need to even out the empty space by “inflating” the other part of the face so that it doesn’t appear shrunken. The picture hopefully explains it:
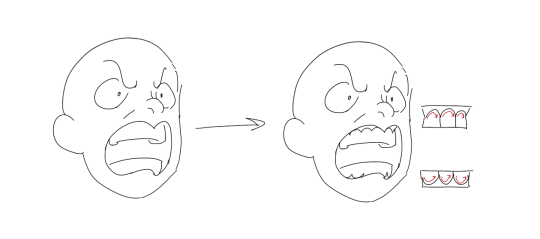
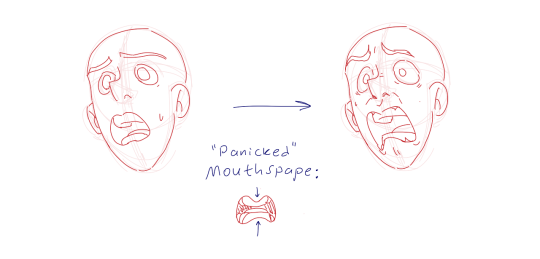
Teeth
Don’t forget to add the gum when the mouth is open to its full potential!
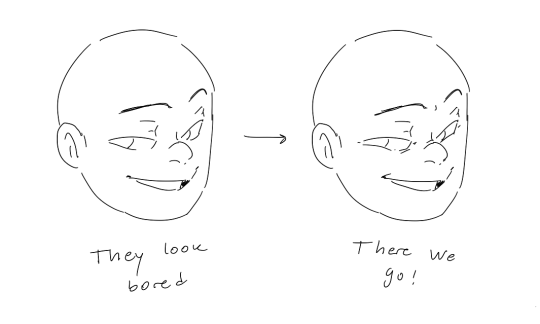
Squinting and folding
Adding folds around the eyes when a character is squinting makes a HUGE difference. It makes a smile more genuine and a growl more intimidating. Adding folds to the face in general makes your characters more lifelike and ‘visually relatable’. Like, they look human, and less plastic or fake.
and so on..
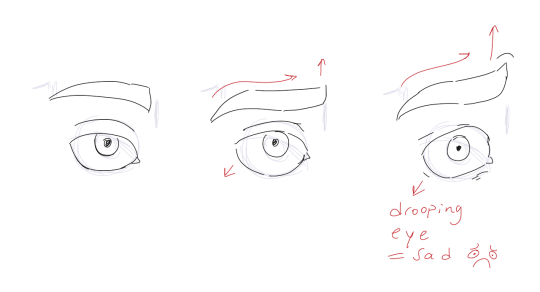
Pupils and irises
The placement of the iris and pupil in relation to the eyelids is very important! The less of the white you see, the more relaxed the character is.
And then of course eyebrows and eyes go hand in hand!
Gestures, spitting, sweating…
Adding more elements than just a face is key to making the character actually look like they are feeling what you want them to feel. Just the tiniest sweat drop adds to their anxiety, spitting adds frustration to their rage, slouching shoulders, waving hands, a double chin, extreme angles, the list goes on! Add whatever and see what kind of impact it makes! Does it do the trick? Great! Add it!
Over exaggeration!!
Remember that you can almost always exaggerate more. Don’t be afraid to do draw “too much” because you’re just experimenting. See what works and what doesn’t. What do you like to exaggerate?
Now that you know some theory, it’s time to practice!
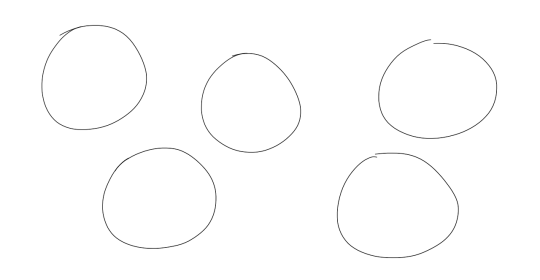
Fill a page with circles and fill them in with different expressions. Try and exaggerate as much as you can!
This is mostly for experimenting. They are quicker to draw than complete faces, but the same rules should apply!
And that’s about it!
I don’t know if I covered everything in this tutorial, since some things might be obvious for me, and this post perhaps only scratches the surface. So feel free to send me a message if you want an explanation about something more in depth! Thank you for reading! And now DRAW!!! ✨🎨
theyre very quick and mostly illustrative, but balance is a HUGE thing in my art.
balance can be achieved by: -opposing directions –|– -opposing equal-weight masses
when the masses are unequal, some visual anchor or support must exist to erase the feeling of ‘this is unstable, this ought to topple off, this looks unnatural being still in that unbalanced position’
the dynamic is achieved by having one focal point that everything bursts/flows from or comes together in/strives towards. it gives weight by giving focus and keeps the motion going by leading your gaze. the opposing masses or lines also pull the gaze in different directions and create sense of motion PLUS weight.
am i making any sense, probably not, my idea is that my style strives to strike the line between dynamic motion and palpable weight to make things feel alive
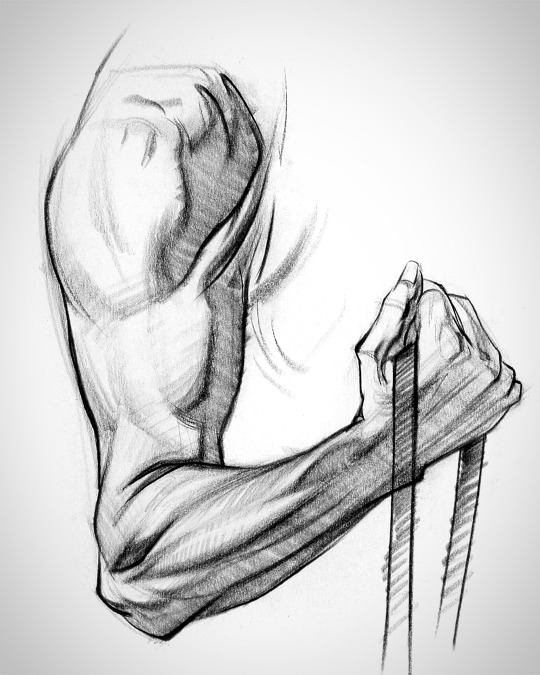
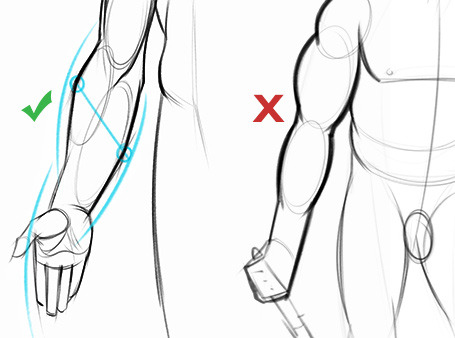
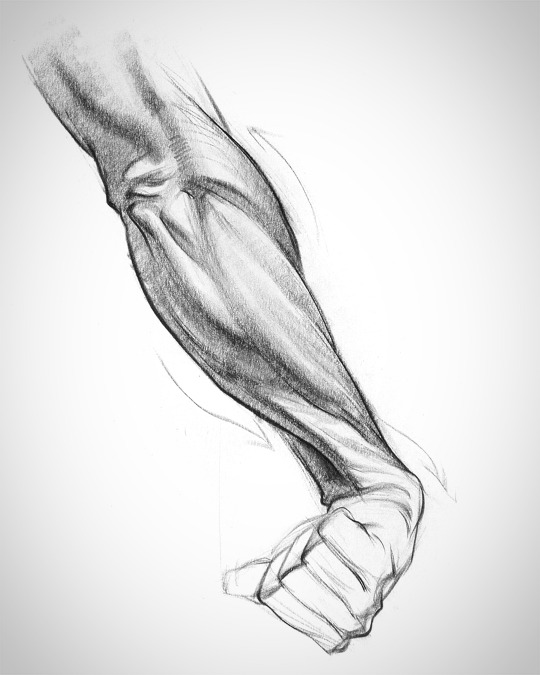
There’s three main groups: the flexors and extensors each take one half of the forearm, and the ridge muscles sit on top like a little tiara. Each group has it’s own unique form. Learning their anatomy will help you design awesomely dynamic arms.
Let’s try to make forearms manageable to draw. This is a body part most artists don’t quite understand. It can be real intimidating if you don’t know the muscles.
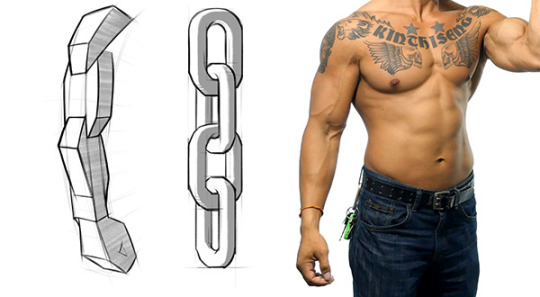
The arm has a simple chain design and the forms interlock down the arm.
To avoid the snowman effect, use straight, angular lines and look for asymmetries. Compare the apex of both sides of the forearm to understand the curvature better. Notice that the flexors reach lower on the wrist than the extensors and ridge muscles.
Look for this kind of thing when you’re drawing the gesture of the muscle groups. A wave rhythm where the curve on one side leads into the next curve on the other side.
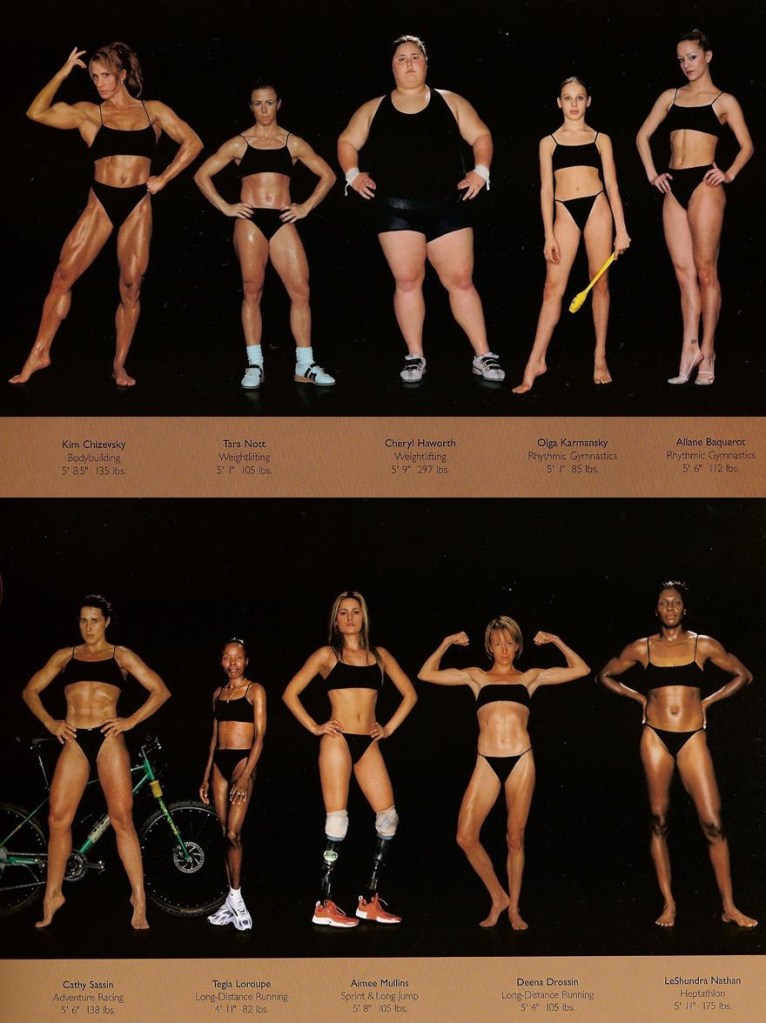
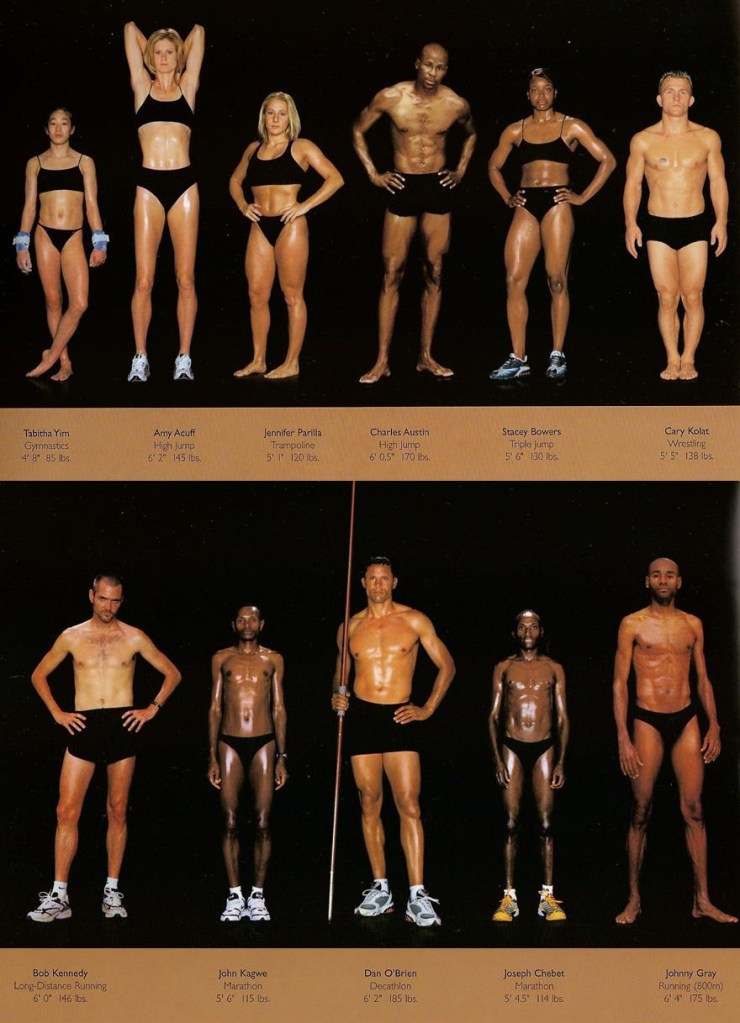
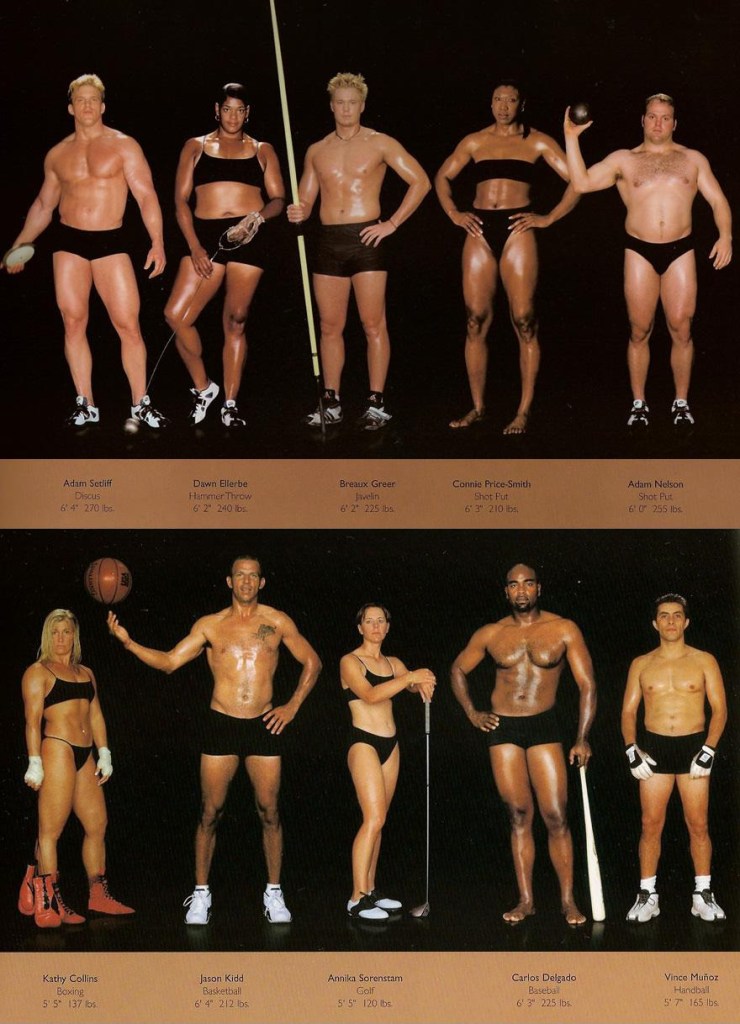
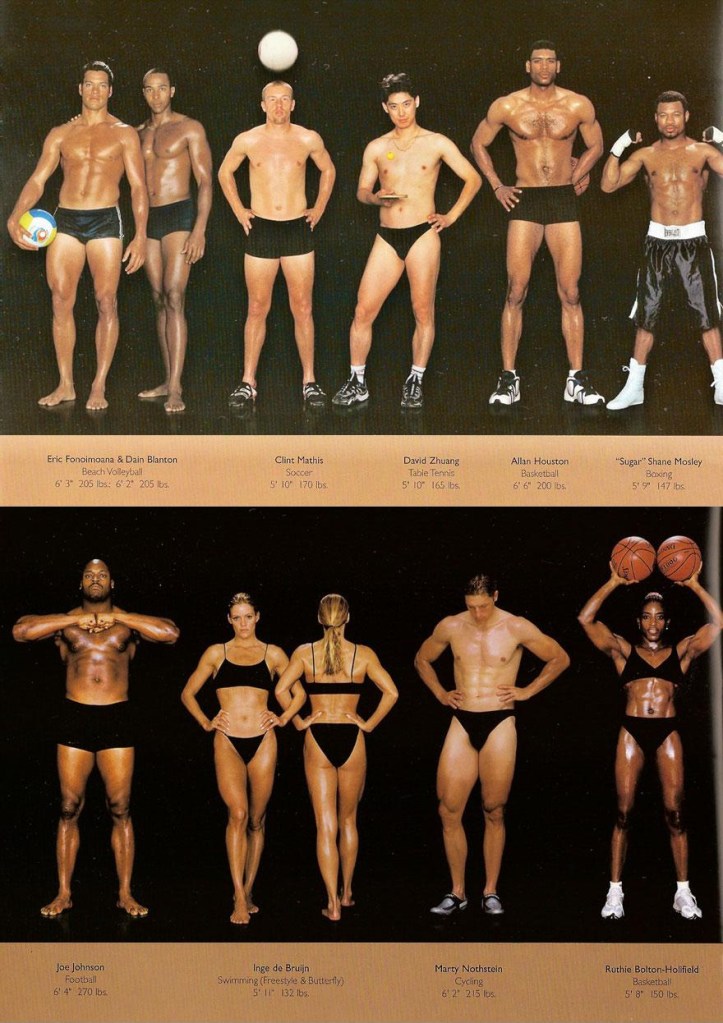
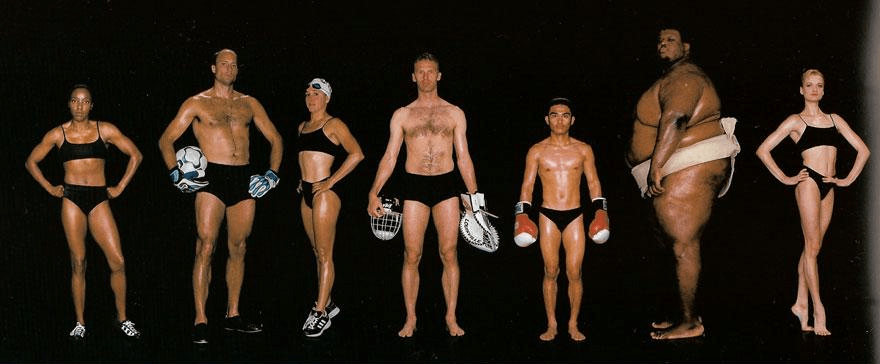
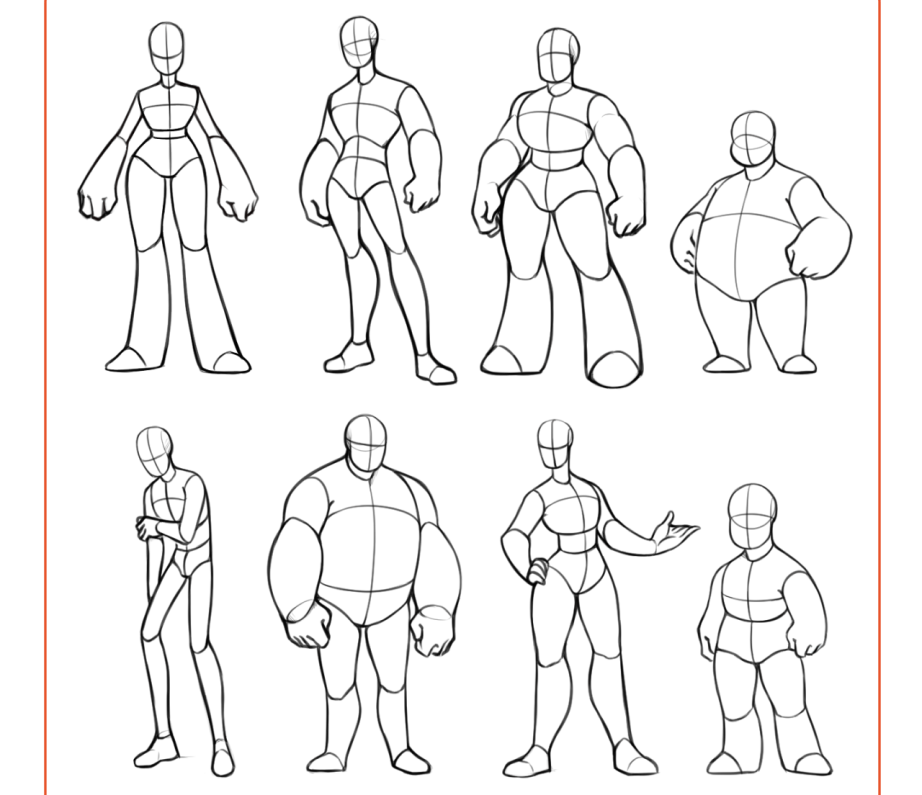
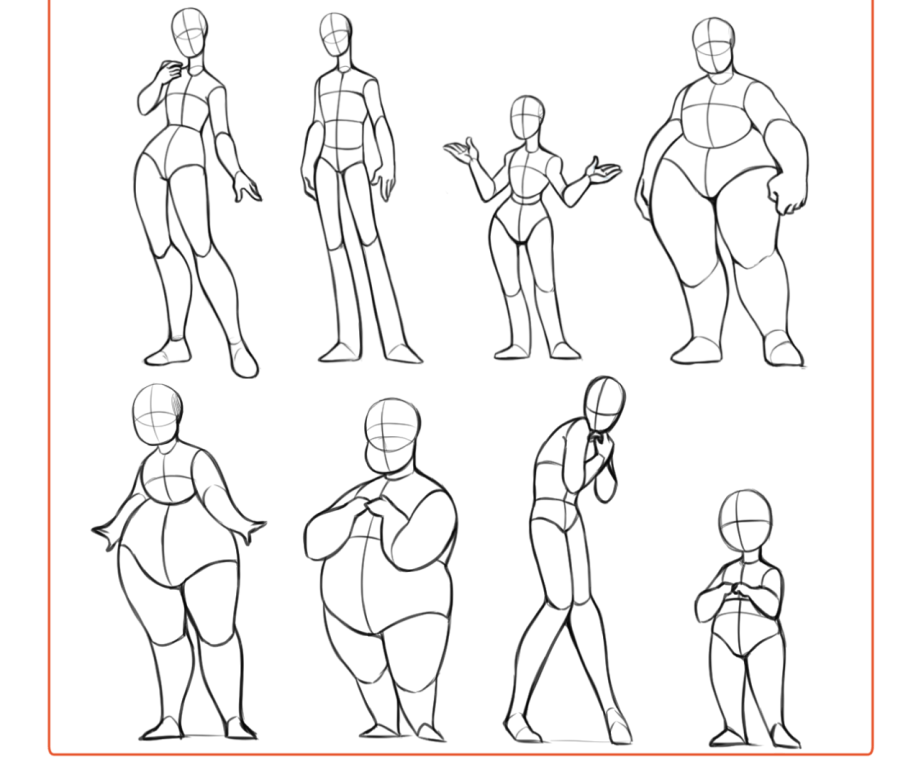
This reference sheet includes 50+ body types for people who struggle in creating unique character bodies. Also I did a mini-breast tutorial, because I didn’t add breasts to any of the body types since breasts are so customizable.
Edit: I added 4 more body types in this preview, since people really enjoyed this reference sheet. I also edited the description of male/female bodies for clearer understanding. Thank you for enjoying my reference sheet, I’m glad this was helpful to many people.